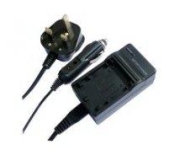
The small 12V input socket on the charger accepts a 3.25mm od/1.3mm id connector plug, one of which was on the car lighter socket cable supplied with the charger. I removed the big lighter connector, and connected the cable to Topsy’s 12V supply. The LED that normally indicates charging does NOT illuminate under these conditions, but the Vx battery is being charged. The current drain for charging the Vx is minimal, and will not affect Topsy’s 12V battery life. This charger is perhaps a luxury, and probably not really required - so long as a Vx is fully charged before use in Topsy, but it is a comfort to know that the Vx will not die unexpectedly!
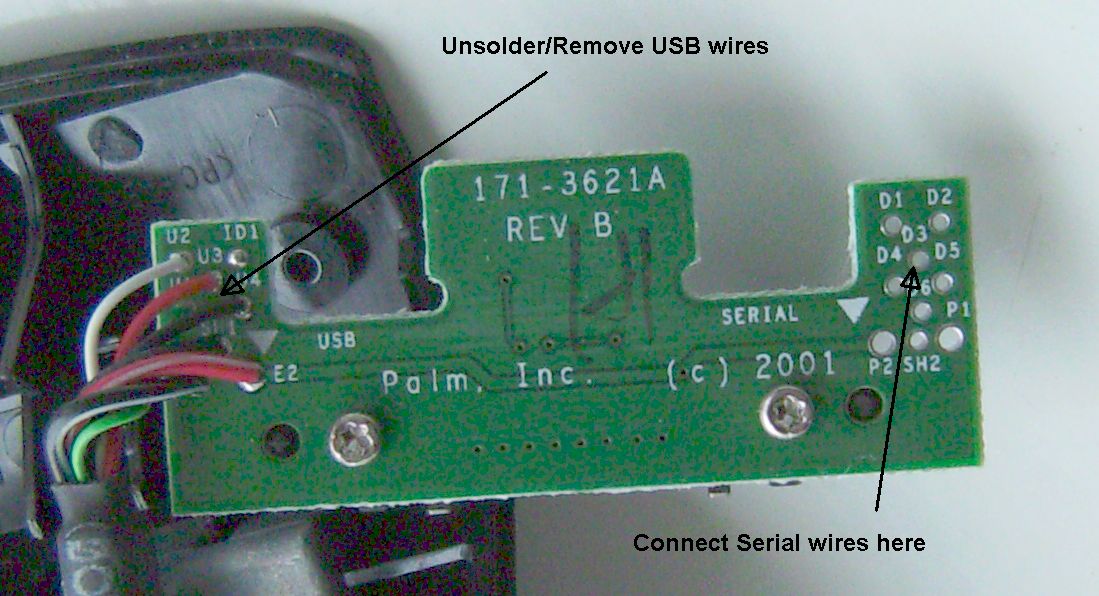
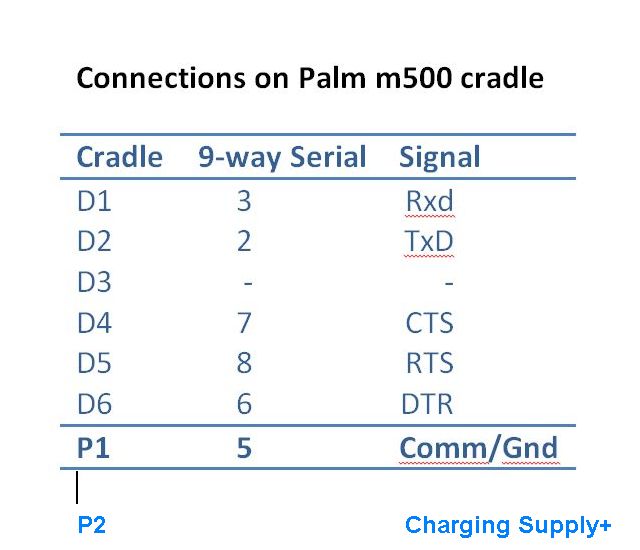
m500's - The battery control circuits in the m500's are built into the Palm, so there is no need for a separate battery charger - all that is required is a STABILISED* 5V supply (+ve to pin 16, -ve to pin 1 on the connector - or pads P2 and P1 respectively as shown in the Serial Connections for the m500 Cradle below) which can be derived from the battery supply in the organ. However, as the m500 series batteries have more capacity than those on the Vx's there is probably no need to have a charging system in the organ itself. * Although a stabilised supply is mentioned elsewhere, my m500 charger unit says it has an output of 12V, and I have also achieved successful charging using the 6V from the battery I have in the organ.
Replacing a V/Vx battery
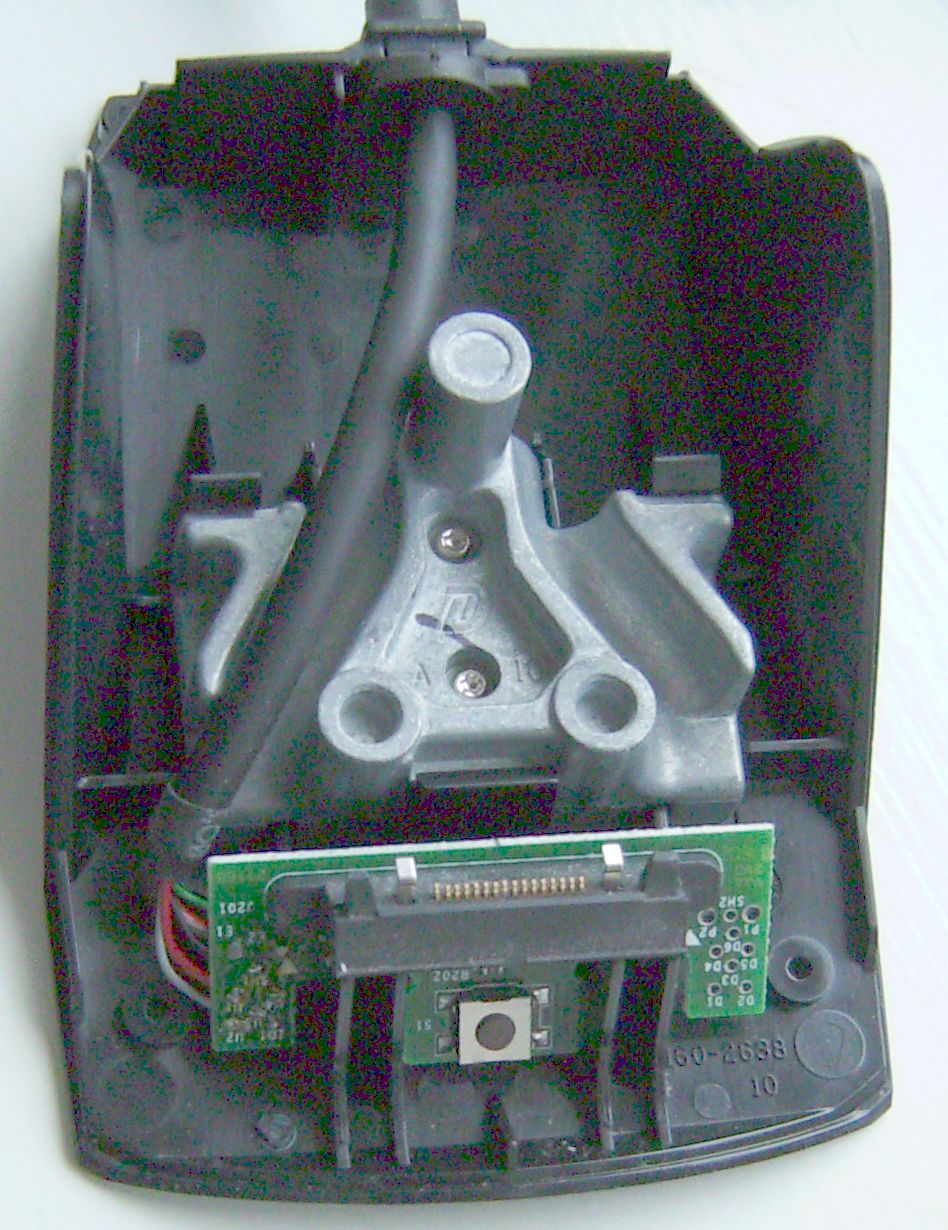
It is true that some of the rechargeable L-ion batteries in Vx’s do not last for ever, but replacements are available on the Internet – search for ‘Palm Vx battery’. Fitting them, however, seems to be impossible as there appears to be no way to open the case. Actually, it can be done, using the instructions detailed at Ifixit. For just replacing the battery, you will only need the instructions in steps 1 - 4 (just removing the back). Unplug the battery connector, then if the battery cannot be prised off, follow steps 10 - 12. After replacing the battery, replace the back, and re-apply some heat to seal it.
At first sight, it all appears quite daunting, but only the back has to be removed to be able to swap the battery - removing the screen is not necessary. However, it was with some trepidation that I approached the task myself. However, by following the – very clear – instructions, I managed to complete the battery change without any major problems, apart from with my blood pressure. Knowing I had the other Vx as a spare was my only comfort during the process, but afterwards I realised that I should not have been so worried.

Replacing an m500 series battery
The battery for the m500's is larger than that for the V series, but is more easily accessible, providing you have the right tool - usually a T5 sized Torx screwdriver or a tiny Philips cross-head screwdriver for some early m500s. Don't try to open the case without the correct tool, you will probably damage one or all of the four screws and make it impossible to open at all. After removing the four screws, the back still has to be 'popped' open with a thin blade around the top and sides of the back cover join, and it does take some effort to get it to open. After replacing the battery, the back has to be snapped closed - again with some conviction - before inserting the four screws. I found an '8 in 1 Torx screwdriver' on e-Bay (item 380118497364) for only £2.40 post free!
Upgrading Palm O/S for III and V versions to 4.1 (not needed on m500's)
The Upgrade software (PalmOS4-1.zip 42Mb - click here to download) begins by installing a version of Palm Desktop on your PC, in the directory C:\Palm. The ‘normal’ software for Palm Desktop (PalmDesktopWin414EN) installs into C:\Program Files\palmOne.
If you have an alternative PC or laptop available it may be best to install the upgrade version software on that machine – after removing any existing Palm desktop program - so that there can be no conflict. If you have any data on the Palm that you want to keep, then whatever you do, before anything else, perform a full Hotsync backup of your data onto your PC with your existing setup . If it is only MIDI tunes that are to go on the Palm, then these can be re-installed later by the Loader, so no backup is necessary.
If no other machine is available, then try using the upgrade software whilst retaining the ‘existing’ Palm Desktop, following the method described below. If this fails to work, then uninstall both the ‘existing’ program and the upgrade, and then install the upgrade software alone. This method means that a user name has to be entered - so there are no conflicts when starting the actual upgrade process. When the OS upgrade is complete, uninstall the upgrade software and reinstall the ‘existing’ Desktop.
Clear ?
Installing theUpgrade
After unpacking the upgrade software, run ‘autorun.exe’ file from the folder into which the files were unpacked. Select ‘Palm OS 4.1 Upgrade’, and your particular palm device on the next screen. You can now follow the on-screen instructions to install the Desktop software. At the end, when you click ‘Finish’, you will go into the start of the Flash Update routine.
Before following the on-screen instructions, you will need to ensure that Hotsync Manager (C:\Palm\HOTSYNC.EXE) is set up correctly. Start Hotsync, then right click on the icon in the Taskbar when it appears, and, whichever you are using, select ‘Local USB’ and ‘Local Serial’. It is OK to have both ticked, and if you are using a USB/Serial converter for the connection, then Hotsync seems to like it that way. Also, right click on the icon again and click Setup, then General/’Always available’ and Local/your serial com port and ‘As fast as possible’. One more right click on the icon, and select ‘Exit’ – the Flash update software should start and stop Hotsync as it is needed.
Going back to the Flash update window, you are prompted to do a Hotsync to create a backup of the data on the Palm, and to watch the palm screen for the eventual ‘Reset’ instruction. After doing this, ‘next’ should become available on the PC. Clicking on ‘next’ should start the Operating System download, and – after accepting that all data will be destroyed - you will get some strange screen displays - which are quite normal. At the end of the update, you will be prompted to Restore the backed up data – I found I sometimes had to retry this to get it to work, but it is not really needed so if it fails to work, skip it, and exit the Flash update program.
If the above has worked as expected, remove the Update Desktop software from the PC (and re-install the ‘existing’ Desktop if it had been removed). You may now need to start Hotsync manually (from C;\Program Files\palmOne\HOTSYNC.EXE), and set it up as described above. I now recommend performing a ‘cold’ restart on the Palm (hold the start button down whilst pressing in the reset hole with the tool from the end of the stylus – or a paper clip), to clear all data stored. Performing a Hotsync should now restore all the data in the backup made at the beginning, and the Palm should be running as normal but with the 4.1 Operating System.
Normal Settings for Hotsync
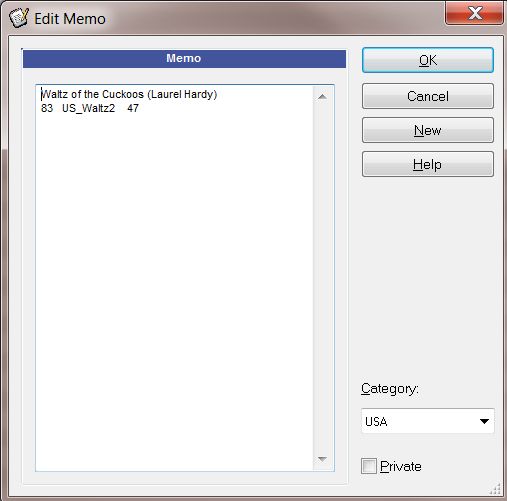
The basic settings are given in an earlier paragraph, but as you are just using the Palm for MIDI files, then there are some other settings worth adjusting. Right-clicking on the Taskbar Hotsync icon, and selecting ‘Custom’, opens a screen where the actions for each of the normal Palm functions can be set. Click on each one in turn, and then ‘Change’. Set the radio buttons to ‘Do Nothing’ and tick the box ‘Set as default’. This can be done for ALL the functions, For the first Hotsync, or to add tunes, temporarily set ‘Install’ and possibly 'Install to Card' to ‘Enabled’. If you are using Memo Pad to store a searchable list of your tunes, when you want to update the list on the handheld, temporarily set Memo Pad to ‘Desktop overwrites handheld’. When all functions are set, click on ‘Done’. Note that settings return to their Defaults as soon as a Hotsync is performed.
You may have chosen to set one of the handheld’s buttons to the ‘Welcome’ function (using Prefs/Buttons) so that you have a means to rest the Digitizer even if it has gone too far ‘off’ for normal selections. If so, you may want to use the ‘Custom’ function mentioned above to set ‘System’ to ‘Handheld overwrites Desktop’ for the first Hotsync after setting the button, and to ‘Desktop overwrites handheld’ thereafter.
If you wait patiently, you can see a video about setting up Hotsync Manager here
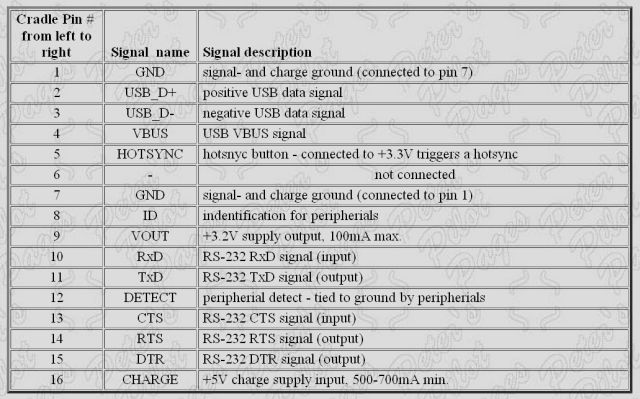
Connector Pin Outs
I found the following pin outs on 'Peter's Pilot Pages' - www.pspilot.de - which contain loads of very useful background information on the Vx, m500's and other palm devices. The Vx has the 10-pin connector, and the m500's the larger 16-pin version.
Using a memory card on the m500's
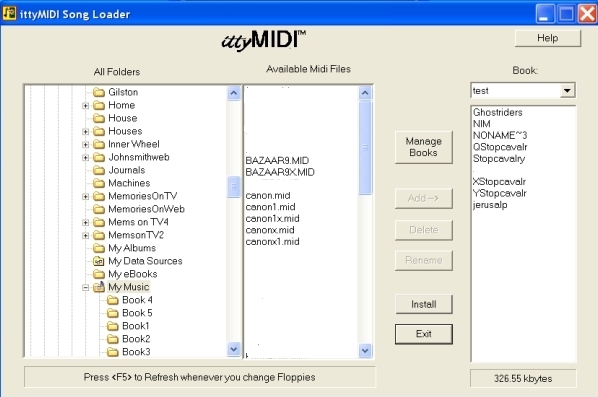
To enable the ittyMIDI Loader to put 'books' of song files onto a Digital card plugged into an m500 instead of into its normal memory, it has to be 'advised' before a Hotsync is performed after 'books' have been created in the Loader.
This requires the use of the Instapp.exe program that is part of the Palm Desktop software package (usually found in . . ./Program Files/palmOne/ ). When this program is started, first select the User, and then Add. Use the Look in box to navigate to . . . .Program Files (x86)/ittyMIDI/Player and you should see the name(s) of the Books which you have just set to 'Install' in the Loader. Clicking on a Book name should reveal two .pdb files. Highlight both these, and then click on Open - which will add the highlighted files to the files list. Click on Add again, and use the 'Up one folder' icon to go back to the list of Booksto repeat the process for all the Books that you want to go onto the SD card.
Now click on Change Destination. A further window opens, which has columns for the 'Handheld' and the 'Secure Data Card' (or whatever) destinations. Highlighting the appropriate files and clicking the >> or << arrows in the middle enables them to be located appropriately. Clicking OK and Done completes the process, ready for the following Hotsync.
The card simply acts as a memory extension - the files cannot be displayed separately, and when the Player is started on the Palm, if it finds books with the same name in internal memory and on the card, it declares that it will ignore one of them. This message can be very irritating as it repeats each time a Book is selected, so try to avoid accidentally putting Books in both memories.
A stated previously the files from the Loader are usually located in a folder in the . . . . /Program Files/ittyMIDI/player directory, and it is these that are redirected as above. However, if - like me - you occasionally let your Palm die from battery exhaustion, your Player program and books will be reloaded from a previous 'handheld backup' when you recharge and do the next Hotsync.
Under those circumstances, the files for the books will be taken from: . . . Palm/User_name/Backup, so if you want these to go onto the card, you will have to 'Add' them manually in the Instapp program by browsing to find them. My user name was JohnsoD.
Obviously, if all your books were on the card, they would probably still be there even though the Palm had 'died', but the ittyMIDI database of file locations may be corrupted by the 'dying' of the Palm, so it may be best to Reformat the card, and use the Loader and Instapp routines again...

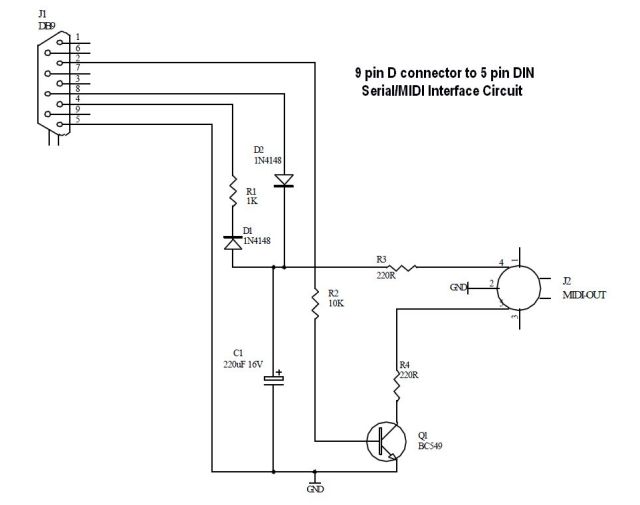
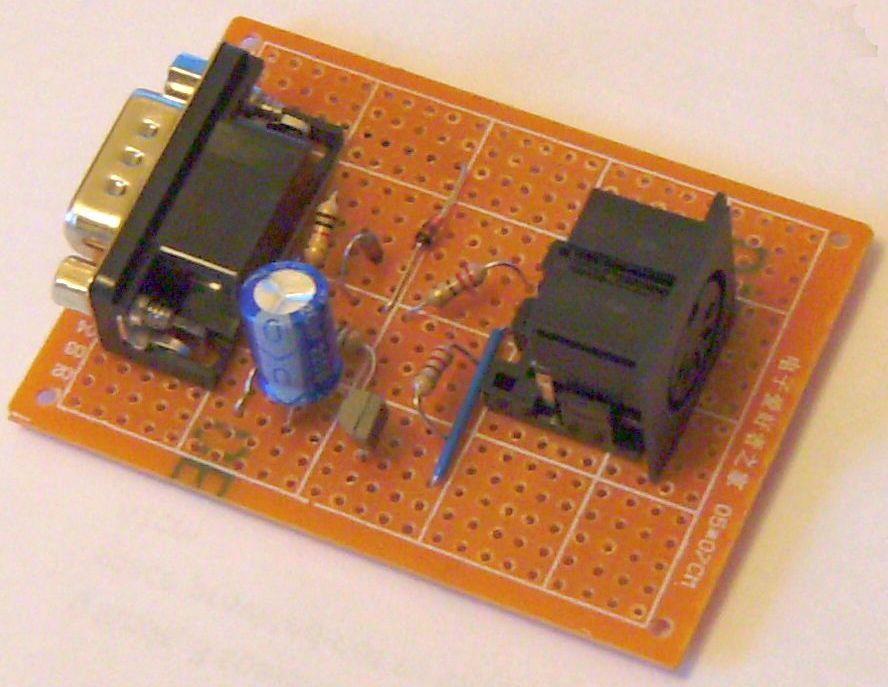
Serial/MIDI Interface Circuit
(originally published by Elby Designs)